

Reasons to Consider When Recharging Your Car’s AC
Recharging your car’s air conditioner ensures that the system has enough refrigerant to operate efficiently. Over time, refrigerant levels can drop due to leaks or natural depletion, leading to reduced cooling performance. Regular maintenance and timely recharges can prevent costly repairs and keep your AC running smoothly.
Signs Your Car Needs a Recharge
- Warm Air: If the air blowing from the vents is not as cold as it used to be, it might be time for a recharge.
- AC Clutch Not Engaging: The AC clutch should engage when the system is turned on. If it doesn’t, low refrigerant levels could be the cause.
- Visible Leaks: Refrigerant leaks can often be seen as oily spots around the AC components.
- Unusual Noises: Hissing or bubbling sounds can indicate a refrigerant leak.

Tools and Materials Needed
- Refrigerant (R-134a for most vehicles)
- AC recharge kit with a pressure gauge
- Safety glasses and gloves
- Thermometer
Step-by-Step Guide to Recharging Your Car’s AC
Step 1: Safety First
Before you begin, ensure you have the necessary safety gear. Wear safety glasses and gloves to protect yourself from refrigerant exposure. Work in a well-ventilated area, preferably outdoors.
Step 2: Locate the Low-Pressure Port
Open the hood of your car and locate the low-pressure port of the AC system. This port is usually found on the larger-diameter tubing between the compressor and the evaporator. It is often marked with an “L” or a blue cap.
Vehicle Refrigerant Guidelines
Vehicles manufactured in 1994 or earlier typically utilized R12 refrigerant. If a vehicle from this era still contains R12, it’s essential to evacuate and retrofit the system, as blending R12 with other refrigerants is prohibited by law. When adding refrigerant, it’s crucial to avoid using the high-side port, as this can lead to serious safety risks. The R12 fitting is easily identifiable by its screw-on hose attachment and tire valve-like design, whereas the R134A fitting features a larger, quick-connect design. Additionally, vehicles from 2013 onwards may employ 1234YF refrigerant, which is incompatible with R134A and should only be serviced by a qualified professional.

Step 3: Attach the Refrigerant Can
Attach the refrigerant can to the recharge kit’s hose and gauge. Follow the instructions on the kit to ensure a secure connection. Do not puncture the can until it is connected to the low-pressure port.
Step 4: Recharge the System
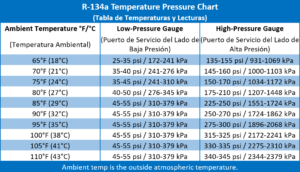
Start your car and turn the AC to its highest setting. Attach the hose to the low-pressure port. Puncture the refrigerant can by turning the valve on the recharge kit. Slowly add refrigerant to the system, keeping an eye on the pressure gauge. The ideal pressure range is usually between 25 and 45 psi, but refer to your vehicle’s manual for specific recommendations.
Step 5: Monitor the System
As you add refrigerant, periodically check the temperature of the air coming from the vents using a thermometer. Once the air reaches the desired coolness and the pressure is within the recommended range, stop adding refrigerant. Disconnect the hose and replace the cap on the low-pressure port.
AC PRESSURE CHART
Tips for Maintaining Your Car’s AC
- Regular Checks: Periodically check the refrigerant levels and AC performance.
- Clean Filters: Replace or clean the cabin air filter regularly to ensure optimal airflow.
- Inspect for Leaks: Look for signs of refrigerant leaks and address them promptly.
If your car’s AC system continues to underperform after a recharge, or if you notice persistent leaks, it may be time to consult a professional mechanic. Complex issues like compressor failures or electrical problems require expert attention. Recharging your car’s air conditioner is a straightforward process that can significantly improve your driving comfort. By following these steps and maintaining your AC system, you can ensure a cool and pleasant ride all year round.
Leave a Reply